Note Identification – Music Theory
Note Identification – Music Theory – Part 11
Scales in Music – A Tonal System
Music Theory Section – Level 1
Note Identification – Music Theory – Part 11
Overview
Note identification is one of the very basic practices for creating and writing music. It is fundamental to composition and to performance. Note identification is the practice of not only knowing the differences between note and rest shapes but also what that means in terms of effect on duration or length of their performance.
Note identification is only one of the many concepts within the bigger picture of music theory which encompasses an array of concepts and tools. We will be presenting these concepts and tools within the complete article series, Scales in Music – a Tonal System.
Music Theory – Level 1 is the first level in music theory that begins the study of the fundamental and comprehensive set of concepts and tools which make up the Tonal System of music. The conventionally accepted tools needed to write out your musical ideas are within the applications of music theory; composition, performance and music notation.
Music theory also includes; learning the tools, understanding their use, knowing how to draw each of their symbols, to use them properly in formal notation, and when and where to place them as needed or required when you create or perform music. In that sense, the symbols of the written language of music becomes your new adopted language when producing music manuscripts.
Music is created using these symbols as the composer writes out his or her musical thoughts using the symbols themselves or they can be used to write down what someone else has written, transcribed the music from a recorded composition or during a live performance, are a few examples of why they are necessary to learn. In all cases note identification is critical to your success when taking any of these actions.
Prerequisite Studies
First Prerequisite – Note Identification – Part 11 presents the musical note, not in terms of the shape of the notes, as was discussed in another article on this website called, The Musical Note, rather it is a short study of associating the note shapes to the staff lines and spaces which establishes a solid foundation for communicating your musical ideas to others. Together both articles are more comprehensive and considerably more meaningful when studied together, I hope you will take the time to review both articles.
Second Prerequisite – Note identification was also discussed in the two-part article series titled The Grand Staff – Music’s Secret Stairway, parts 1 and 2. It would be to your benefit to review them before starting your review of this article. Make it a point to specifically review the staff itself, the clefs and ledger lines used to extend the musical staff, all will be helpful when reviewing this article as well.
Glossary Reference – The alphabetical glossary of music terms should be used if you should find yourself not remembering or not knowing a particular word’s definition.
Personal Responsibility – Simply reading the words and looking at the pictures is one way of reviewing these documents, understanding the information and how to use the principals, concepts and tools is yet another. It is far more beneficial for you in the long run to take personal responsibility for your learning and use these articles and/or other resources, such as a music teacher or professor, to really learn music. With that said, I would strongly suggest, if your interests lie in learning about music and music composition, that you take your time to study the information throughout these articles and by further investigating for yourself the referenced materials available through the links provided. Also, I would urge that you seek out other and additional resources to aide in your musical education
Don’t worry! You will not be tested by anyone other than the test where you have found your own music enjoyable to listen too and maybe where others feel compelled to let you know how well they have enjoyed it too. Enough said.
Let us continue then within the Music Theory Section of the overall article series titled Scales in Music – a Tonal System. It continues here as Note Identification – Music Theory – Level 1 – Part 11 of that series.
Naming Notes
The Seven Letters – If you will notice that in the various charts and graphics used throughout modern music, that only certain and specific letters are used to name the natural notes so that we can easily recognize them or at least discuss them with a fair amount of consistency as to their name.
To be more specific and thorough, the seven letters representing the tones used in music are the only letters in the English alphabet used in naming musical notes; A, B, C, D, E, F and G. Sometimes the designations are referred to as the spelling of the note. There are some variations especially when the note has to be altered to “fit” into a scale system or better still, to act as a relevant and pleasing note within a specified series of notes.
The Staff – Note Placement
Note Placement – Note placement, on the other hand is where we put the notes on the five-line four-space staff. This is the primary factor in naming notes.
Notes are placed on either a line or in a space of the musical staff. Each line and each space has a designated name. When a note is placed in a specific location on the staff it assumes the name of the line or space on which the note is placed. There are other symbols used in music notation that change that rule and we will discuss these later in this same article.
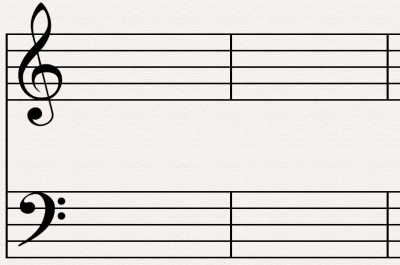
The chart above shows a portion of the piano staff which includes both the treble and bass clef staves and their respective symbols. The vertical lines, in the middle and to the right, delineate one measure from the next, so two measures are shown in the chart. This piano staff layout also includes a vertical line which ties the G-clef and F-clef staves together. It is the line on the left of the chart above.
The piano staff is a basic staff structure which we will be taking parts of to show specific tools used in music notation. Since some of you are familiar with the treble clef and others are familiar with the bass clef, we will present information from the overall concepts within music theory on each staff making it more user friendly for both. This presentation can be used as a foundation for extending your learning about both staves and their related line and space names.
Treble Clef and Bass Clef Line & Space Names
I do not feel the need to change the conventions commonly associated to the names of the lines or spaces as they have historically taught to many who have come before which makes it easy to remember them. Here are those conventions.
Treble & Bass Clef Line and Space Names
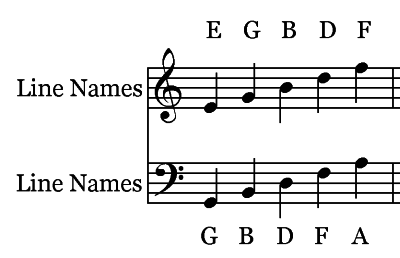
Treble Clef Lines
EGBDF = Every Good Boy Does Fine.
Bass Clef Lines
GBDFA = Good Boys Do Fine Always
Treble Clef Spaces
FACE = Spells the word face
Bass Clef Spaces
ACEG = All Cows Eat Grass
You are free to make up your own or to use the conventional acronyms as described above. Use whatever method will help you to remember them.
Notes on the Lines – To clarify this better, the following two graphics show the note names associated to the lines and the spaces of the G-clef and F-clef staves. I have also prepared an mp3 of these notes and the highlighted mp3 link is shown for each set of notes and labeled as such.
The violin is playing the notes on the treble clef and the cello is playing the notes on the bass clef.
The chart and the sound samples above demonstrate all of the note names based upon their placement on either the G-clef or F-clef staff. What is nice about this is that all of the line and note names are always the same. They never change unless you use a different staff such as the C-clef staff, for example. Since most music is written on these two staves it is important to learn them, so once you do you will be pretty much set.
One additional comment – Depending upon which instrument is playing these notes they will sound similar in the basic sense, however, they will also sound somewhat different. The reason for the differences is each instrument is unique and it can be made from different materials, different quality of materials, is a different size, has different string tensions, etc. Consequently, each has a different character or creates and emanates different sound qualities. This characteristic is known as Timbre and it is discussed in the Basic Characteristics of Soundarticle. Please refer to this article if need be.
Spaces and Note Names – The same holds true for notes placed on the spaces of the staff as shown above.
Together these two charts include all of the natural note names for the lines and spaces as commonly used in music as well as graphically showing where the notes are actually placed on the staff. Hopefully the mp3’s help you with the associated sound. I suppose inadvertently we have started a bit of ear training by presenting the information in this way.
All of the natural notes and their related line or space are named on both the treble and bass clef staves.
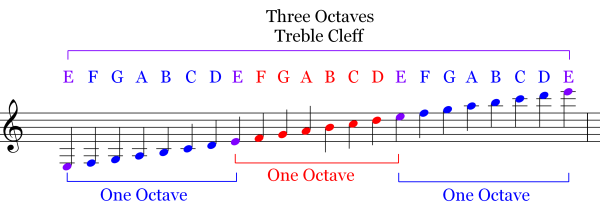
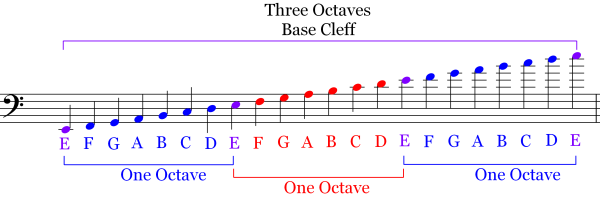
Three Octave Span – We can look beyond the five-line four-space staff by using ledger lines. The next two graphic displays include note names spanning three-octaves. You may want to make a mental note of the note names that are on the ledger lines and those in the spaces between them. I would recommend learning the note names for up to a minimum of three ledger lines above and three below to start.
Without any other mechanism to alter their locations on the staff, one can see that it might become a bit difficult to read note values written way up high and way down low, especially to the extremes possible.
For our next example, we have made a G-clef chart showing the three ledger lines both above and below the five-line four-space standard staff.
For this next example, notice how it can become very difficult to quickly name the notes for notes for those placed either on a line or on a space when there are so many ledger lines as seen on the left of the chart below. Again, three octaves are shown.
The notes shown in the two charts above are not inclusive of all of the notes available for either staff, however the majority of music is written in the three octaves shown above. Higher and lower notes are available but only on certain instruments which will be explained in later posts. The intent is to demonstrate the note names only spanning three octaves on each staff and to demonstrate the difficulty of reading music on a staff with many ledger lines.
Altering Note Frequencies – Octave Marks
For this very reason, other notation marks were adopted which alter a note’s playing range or the octave in which the performer is to play it in. The octave marks makes it much easier for the performers to read the music at the same time especially when music is written so far above or below the staff.
Rather than raising or lowering a notes value by a half step or more, as the accidentals cause or directs, the octave marks tell the performer to play them either an octave above, an octave below, two octaves higher or two octaves lower than as notated on the staff. The note name remains the same however the note’s frequency value is changed as a consequence of using these octave markings. We just move up or move down one or two octaves depending on the mark’s instructions which we will demonstrate below.
In our discussion and presentations on the concepts of frequency we showed that the frequency is doubled when two notes of the same pitch are an octave apart. You may want to review these two articles, Acoustics of Music – Frequencies and Table of Frequencies to refresh your memory or to look further into this concept as a reminder or if you do not understand this concept.
The octave marks shown immediately below are used to change the notes frequency value in this case one octave above where it is notated on the staff. The following four graphics show the main octave marks used in music notation, the Ottava Bassa and the Quindicesima and their respective variations.
The Ottava Bassa symbol is used to raise the notes value an octave above its location on the staff and it is shown immediately below.
Ottava Bassa – va – In the above graphic, in the first and second measure, we have tied together two whole notes placed on the staff as C notes. Above these two measures is the octave marking, ottava bassa – va (shown in red), directing the performer to play this note one octave higher than as notated. The consequence of this direction alters its frequency but not its note name. The performer would play these notes as shown in the second two measures, one octave higher than as shown in the first two measures when using the ottava bassa va marking.
The sound clip provides an aural example of the effect of using the ottava bassa va symbol.
It is important to take note of the actual design of this marking in so far as there multiple parts to it. First, the number 8 is used to designate eight notes and the va letters tell you to raise the notes frequency, so you play the designated note, eight notes or one octave higher than shown on the staff.
Secondly, a dotted line carried to the end of the passage and one short vertical line at its end pointing downward is used to instruct the performer how long to play at this octave level and where to stop the instruction. Generally, if only one note is required to be played one octave higher only the number 8 or the 8av is used otherwise it is required to use the dashed and vertical lines as shown. This general design holds true for most of the octave markings, however there are subtle and important differences so we are showing them separately.
Ottava Bassa – vb – In the chart below, the second ottava bassa is shown. Again, we have tied together two whole notes placed on the staff as C notes. Below the staff of the first two measures is the octave marking ottava bassa vb directing the performer to play this note an octave lower than as notated. The consequence of this direction is to play the note at the location shown in the second set of two measures. In this case, one octave below.
Graphically, three differences exist between the ottava bassa va and vb symbols. The ottava bassa va, placed above the staff, and ottava bassa vb, placed below the staff. The second difference is in the designation va versus vb. The third difference is in the direction of the vertical line at the end of the dotted line. One points upward, ottava bassa vb and the other is pointing downward, the ottava bassa va. The ottava vb is shown above to aide in your understanding of these two symbols. The common use of the number 8 is used to designate the raising or lowering of the note or notes by one octave.
Quindicesima – In the next chart, we are using a different starting note value in the display. We have tied together two whole notes placed on the staff one octave lower than the previous two examples and again, it is a C note.
Above the staff of the first two measures, again shown in red, is the new symbol for directing the performer to play the note two octaves higher than as notated on the staff. The consequence of this direction is to play the note at the location shown in the second set of two measures, two octaves above. Here is the marking and the audio file clip for the quindicesima ma.
 You may be wondering why we perform the notes under the quindicesima at two octaves using the number 15 rather than 16. Here’s the short answer, since the octave note above the first C is also a C note and it is the top note of the first octave it is also the bottom of the second octave. We cannot count it twice so we only count it once making for fifteen notes rather than sixteen. Secondly, instead of using va to designate its complete instruction we are using the ma designation.
 In the above graphic, we have tied together two whole notes placed on the staff one octave higher than the first two examples and it is also a C note. Below the staff of the first two measures is the new symbol (in red again) for directing the performer to play the note two octaves lower than as notated. The consequence of this direction is to play the note at the location shown in the second two measures, two octaves below the notes staff placement.
Graphically, three differences exist that are similar to the ottava bassa where the first difference is where the quindicesima ma is placed above the staff and quindicesima mb is placed below the staff. The second difference is the direction of the vertical line as one points upward, quindicesima ma and the other is pointing downward for the quindicesima mb. Finally and somewhat redundantly, the designations of ma versus mb complete the differences between these two symbols. An audio sample is provided to assist you in expanding your internal awareness of the symbols.
Just as a reminder, these octave symbols, the ottava bassa and the quindicesima, do not alter the note name but they alter the frequency value by changing which octave the note is to be performed in.
Altering Note Names – Variations Using Accidentals
As one would guess it is not always that easy and variation and exception are often the “norms” within music, however, conventions rule the majority of the time.
Note names can be altered and in music notation there are some additional markings used to alter a given note’s name making it necessary to learn about the symbols that perform this function. This is especially true when learning about the various scales available to a composer and for constructing chords and chord progressions throughout the various musical keys used in music. The term used to describe the collection of note altering markings are called Accidentals.
Due to the nature of this series of articles we will be limiting most of this part of the presentation about accidentals to the five primary accidentals used in music notation.
Further, rather than explain two specific applications of their usage in this article we have included it within this series and it is called Accidental Applications.
Here we will be informing you about them by showing their respective symbols with a brief descriptive explanation of each symbol.
Accidentals
Accidental symbols are used to alter the notes name. The main accidentals used in music notation are; the natural, sharp, flat, double flat and the double sharp symbols. The accidental symbol is placed to the left of the applicable note shape. Below is a graphic of each of the three most commonly used accidentals found when reading notated music.
Immediately below each graphic is a short sound clip representing the sound of the natural note and the altered note. The first note of each sound clip is the natural C note followed by alternating notes, natural note, altered note ,natural note altered note, each reflecting the effect of the use of the designated accidental. There are five notes in each audio clip.
You can also compare two or more of the sound clips by playing each, either consecutively or varying from one to another so you can get an idea as to what affect each symbol has on the notes sound.
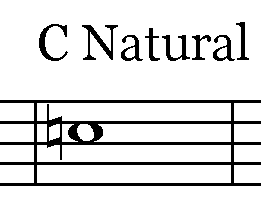
C – Natural – Typically, a natural note is not designated by a specific symbol as was shown earlier in this article. There are cases when it is important to use the natural symbol, however this symbol does not alter its natural note value or the sound produced by any instrument playing it.
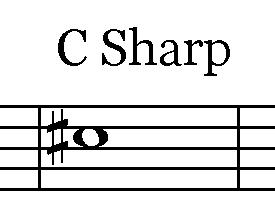 C Sharp – The sharp symbol raises the natural C note by one half step altering its note name from C natural to a C# or C sharp. It is important for you to remember that the notes value is raised only by one half step.
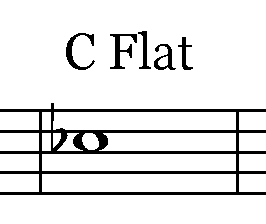 C Flat – The flat symbol lowers the natural C note by one half step altering its note name from C natural to a Cb or C flat. It is important for you to remember that the notes value is lowered only by one half step.
Two More Accidentals
Other symbols are used to alter the natural notes more than one half step. The next two accidentals are also important to know and both are used in music notation as well. These are shown below; the double sharp and the double flat.
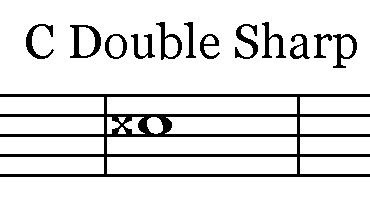 C Double Sharp – Raises the C note by two half steps, or one whole step consequently, a natural C note raised by two half steps would use the symbol shown above, Cx or double sharp and in this case, the note would sound the same as a natural D note.
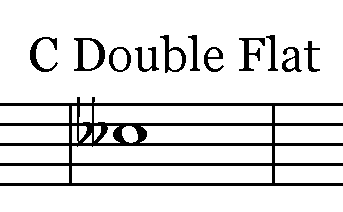 D Double Flat – Lowers the C note by two half steps. There is only one half step between the B and C notes. We need two half steps to get to the sounding pitch designated by this symbol so instead of a B note we are required to go one half step lower to the B flat note.
It is important to know and understand that all symbols used in music notation provide specific instructions from the composer to the conductor, performers and those who enjoy reading music. These instructions are primarily designed to direct the performer to play in a certain way or to play a certain note different from the natural note as in the case of those notes marked with the accidental symbols.
Conclusion of Part 11
This concludes part eleven of The Tonal System – Scales in Music. Note identification is an important aspect of the foundation of music notation. It is necessary to gain the understanding of these tools and concepts. Current and future articles will touch upon the majority of the concepts in music theory. We will be discussing the musical rest in Part 12 of this article series.
When thinking about learning, I believe the brain learns fast. One simple concept can be built upon incrementally or in a manner so as to make the more advanced concepts “fit” into a much bigger picture. This helps a student to learn the value and importance of the advanced concepts in a basic sense and at the same time opens the channel within their thinking about them.
Lastly, we strongly suggest that you continue your study of note identification by reviewing our article titled “The Musical Note” as it covers additional features of note shapes, noteheads, note flags, tying them together and additional material to complete your study of them.
Next Up
We hope you have found Note Identification – Part 11 useful. Next up in Music Theory Section – Level 1 is information about musical rests, their symbols and their usage.
Please proceed to Part 12 of The Tonal System – Scales in Music, Music Theory Section – Level 1. It is called; The Musical Rest – Silence in Music.
Please proceed to The Musical Rest – Silence in Music – Part 12.
Mini Series Links
To return to the Music Theory – Level 1 directory for the article listings within the series, please proceed to Music Theory Section – Level 1 – Series Introduction – Part 10.
To continue onto Music Theory – Level 2 directory for the article listings within the series, please proceed to Music Theory Section – Level 2 – Series Introduction – Part 20
To proceed to Acoustics of Music directory for the listings within the mini-series, please proceed to Acoustics of Music – Part 1 – Series Introduction.
Credits – All graphics were produced using the Sibelius 7 music notation software from Avid Technologies and the Wavelab 7 music editing software from Steinberg.
Note Identification – Music Theory – Part 11

