Home Studio Project – Wood
My Home Studio Project – Wood
Home Studio Project – Wood
This article will cover one of the most important aspects of my home studio project, the tools and the wood I used to build it with. Wood has always been a reminder to me of being outdoors in nature. There is nothing like a hike through multiple valleys in the mountains right along the treeline where pine trees are prevalent and the aroma is unlike anything else in the world. I wanted to bring the outside in so I could experience it in my home studio since I spend so much time there.
I hope the first two articles about my home studio project were helpful or at least a reminder and possibly a small motivator for you. Who knows maybe this will help you to get to the point of taking action and getting yours done too:)
I will be using photos cropped to show the different wood pieces used in this project and some details you might find useful. So, let’s get right to it!
First, the framing installation was all done using the standard pine wood 2 x 4’s most people are familiar with. My choice was to work with 8′ long pieces as very few 12′ pieces were needed, besides the 8′ long 2×4’s are less expensive than the 12′ long ones. Both 8′ and 12′ are standard lengths for construction grade lumber and all DIY stores carry them so they are readily available.
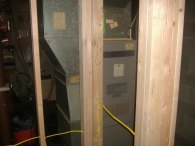
Our first photo shows a small portion of the room, specifically a corner of the room where a short wall is connected to a long wall. The single 2×4 on the left side of the photo is part of an 8′ long wall. The bundle of 2×4’s in the middle is the actual corner where the short wall joins it. The bundle on the right is for another short wall so in essence you are looking at parts of three walls in a “Z” pattern in the photo below.
I chose this photo to demonstrate a single 2″x4″, a double and a triple 2×4 framing setup. Actually there are four pieces used to make the one on the right when you add the third wall framing. The multiple 2×4’s were nailed together using 12D treated nails 3.5″ long. They are nailed together from both side of the bundle. Most of the room was framed using 2×4 pine wood materials and in a few instances I used a 2″x2″ instead, specifically around the heating vent.
Not shown in the photo are the top boards for each wall. There are two of them nailed together to make the header for each wall. Along the bottom of each wall are additional 2×4’s however the bottom boards were treated lumber as required by city code. The treated wood helps to prevent premature decay of the wood in case moisture is a problem or if the area get flooded periodically. My room is dry, thank you very much!
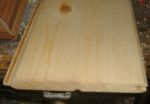
For the main outer wall material I used a knotty pine, tongue and groove series of wood panels. Each panel is 3/4″ thick and 7-3/16″ wide. Again, I used the 8′ length however, 12′ is available for these too. The next photos show the two sides, top and bottom of each panel. One side has a groove the full length where the other side has no groove. I alternated them throughout the room which made for a visually appealing wall surface.
You can see the tongue and groove in these photos. The tongue and groove is how they are tied together once hung making your wall. I took a couple more from a different angle to get a better view of the tongue and the groove sides of each panel. For those who may not know, the first one or the top centered one is of the grooved side of the panel and the second one is the tongue side of the panel.
The next photos shows them together. I offset them just a bit to see this better. The are placed where the panel side with the tongue fits snuggled into the groove of the next panel throughout the room to give a very good overall appearance to the final assembly.
 Taking a slightly different perspective, I put a couple of long panels together , side-by-side, to provide the look of the knotty pine as it would appear on a wall once installed and to show how closely the tongue and groove fits together. Basically you cannot tell where one ends and the other begins if you do this correctly.
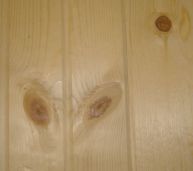 The double knotted and grooved panel on the left fits perfectly against the flat surfaced panel. It goes together really fast and it is not too difficult unless you have uneven walls. You will need to use a small rubber mallet to tap the boards together is the fit is snug.
Oh, I used 4D Finishing nails tapped in on an angle, on the tongue side of the panel, were used to secure them, as each was set up and placed together. Be careful when you do this as if you miss or hit one of the tongues or one side of the groove you will break it off. As I have already mentioned they go together rather quickly so taking a little time tacking them in place will prevent this from happening.
Beyond the generic 2 x 4’s and the main knotty pine paneling I used several different sizes of wood trim. These were also pine wood and were used to finish the edges and corners where two panels meet or where they come from different directions. The photo below shows the following sizes of trim; 1″ x 2″, 1″ x 3″, 1″ x 4″ and 1″ x 6″. The largest size I used was a 1′ x 12″ and it was used only as the base of each shelf in the built-in bookcase. This is not shown in the photo below but I think you get the idea.
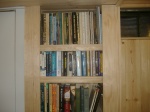
Below is a photo of how the wood trim pieces were used. It shows the left side of the built-in bookcase. The 6″ board is the vertical one on the left. The top 1″ board is actually one of the 12″ wide wood trim panels used as the shelf base and the lower 1″ board is the 1″ x 2″ trim used to give it a somewhat decorative look. The were offset by 1/8″ to give it a bit of a decorative look.
Here are two more showing a broader view of the use of the trim boards for the bookcase. The offset trim below the shelf of the bookcase can be better seen in the photo on the left. The right photo shows how I trimmed both the left and right sides of the bookcase with 6″ wide wood trim boards to not only make it look nicer but to make it fit better with the existing shelving on the left, painted in white.
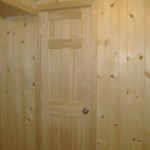
The doors were the most difficult for me to choose. I never new there were so many different styles to select from. They did have knotty pine doors however I elected to go with the solid pine wood 6-panel doors instead. I think they look nicer and the consensus supported that choice for use in my home studio project. For all of my wood choices I took my time selecting the actual boards watching for things like flaws, overall appearance and specifically for the clearly detailed grain of the wood.
Lastly and just as important, pine wood is essentially an aromatic wood. It’s smell will linger for many months and maybe even past a year. It is because of that reason alone that I chose not to finish the wood with a stain, varnish or shellac. Maybe at some other time I will do that but for now I am happy with the way it is.
In subsequent posts, I plan on showing some of the challenges I faced when building this home studio project and an overall room view so you can see the results of me effort the finished studio project.
I hope this series of posts about my home studio project and the wood I used to built it is in some way helpful or motivational to you. It is somewhat off of the main topics intended for this blog however, I thought it essential to include this article series because it does deal with something most will find useful in their own studio project. After all, it is definitely part of the environment in which I will be composing a lot more music in the coming weeks, months and years to come. I can now do my work in a far more enjoyable setting now that my home studio project is completed!
More soon.
My Home Studio Project – Wood


